White to move
1.G13-E11-G9-G11-E13XC15!
(not 1.G10XI10XI12? D14-F14XH12XJ12 wins)
1...... H10-I10
2.F12-F13! E14XG12
3.F9-F11! G12XE10
4.F10XD10XD12XB12XD14 wins
~~~~~~~~~
The following article was
first published in 2001 in the magazine Abstract Games.
Paul Yearout, its author, is one of the few expert Camelot players in
the world. The article has been edited by Michael Nolan only to
substitute official
WCF notation for the abbreviated algebraic notation
originally used by Dr. Yearout.
FIRST THOUGHTS ON CAMELOT END-PLAY
by Paul Yearout
When a piece has an unobstructed path toward the
opposing castle, counting squares shows the number of moves needed to reach the
goal. If each side has two such pieces, the game becomes a race, with counting,
rather than moving, determining the winner.
Modifying the count is the
two-can-travel-faster-than-one principle. Consider the position in Figure 1.
Figure 1
Seven moves are needed to castle both pieces. But
shifting I4 to the symmetrical D4 reduces the number of moves to four. For two
pieces traveling together, the most efficient lines are the two central files
and the diagonals A7-G1 and L7-F1. Compared to the C5, D4 pair, pieces at D5, E4
or B5, C4 require five moves, and an A5, B4 pair uses up seven. So one should
aim towards one of those four lines as early as possible. Pieces at E7 and C5,
moving singly, require ten moves to castle. Moving C5 to D4 and E7 to E3 cuts
that total to eight. But moving E7 to D4, by one of several paths, makes a
further one move reduction.
Further modifying the count is the presence of
opposing forces, even when they appear to be far outpaced by the attackers.
Consider the position in Figure 2.
Figure 3
With the attacker to move, 1....I2-J3, followed by
2.G2-I2 allows a trade for a certain draw or further retreat. If the defender
must move, 1.H2-F2 J2-H2 produces the same configuration, one space closer to the
castle. Choosing 1.H2-G3 J2-H2, 2.G3-F2, the pieces occupy the same squares, but
the attacker must move. 2....H2-J2, 3.F2-H2 places the attacker at the
disadvantage previously mentioned, while 2....H2-I3, 3.F2-H2 I3-J2 produces a cycle
of moves. [Editor's Note: This is a mistake in the analysis. 3.F2-H2
allows 2....I3xG1 with victory to quickly follow. Correct are either 3.F2-F3 or
3.F2-G3; both moves easily draw.] The position is a draw.
If the four men are replaced by four knights, the
side to move first loses. Any move by the attacker loses at least one piece,
after which the erstwhile defender cannot be prevented from a triumphal march to
the opposite end of the board. The defender’s only choice is 1.H2-F2 J2-H2, 2.G2-E2
I2-G2, 3.F2-D2, G2-F1, with victory on the next move.
Intermediate mixtures of men and knights have
various outcomes, depending both on the material and position. Consider the
position in Figure 4.
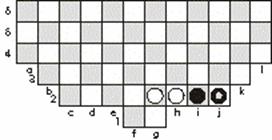
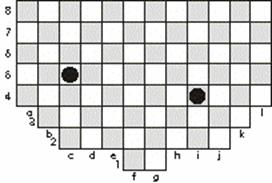
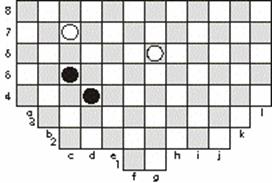
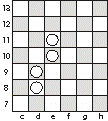
The only defensive move is now 1.H2-F2. After
1...J2-H2, 2.G2-F3 I2-G2, 3.F3-E2 G2-F1 the attack has succeeded. There is the
desperation move 4.F2-G3 H2xF4, 5.E2-F2. If there had been no provision for castle
moves, the defense could maintain opposition for a draw. But 5....F1-G1 forces
the defense to clear a path for F4 to reach the castle. Other possibilities,
such as interchanging knight and man, are left to the reader. [Editor's
Note: For a complete analysis of those possibilities, go
here.]
Already a few middle-game questions can be asked:
How early should one begin watching for certain material combinations? Before
getting to end-play will there be stalling moves to provide the initiative
later? Can unfavorable circumstances be reversed?
Observations about
the castle-move rule
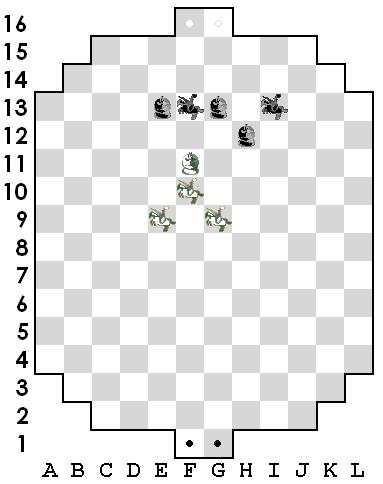
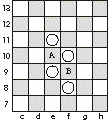
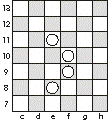
Consider the position in Figure 5, in which each
player has used both castle moves.
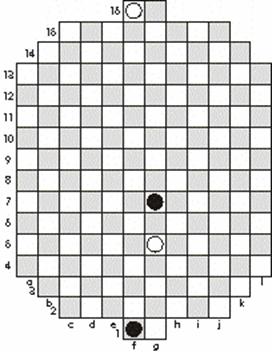
Figure 5
The position is reminiscent of opposition at
Chess, but these are not Chess kings. [Editor's note:
For a discussion of the opposition in
Camelot, go
here.] In Camelot the attacker has the advantage,
whoever has the move. The pairs of moves 1.G5-F5 G7-H6, or 1.G5-H5 G7-F6 allow the
attacker to advance, with other moves by the defense being even worse.
The attacker on the move marches to the edge of
the board, say to K7, with the defender following along to K5. But then
5....K7-L6 has gained one rank on the board. There follows 6.K5-K4 L6-L5, 7.K4-L4
(or 6.K5-L4 L6-K6, 7.L4-K4 K6-L5, 8.K4-L4, resulting in the same position either
way). Now, 7....L5-L6 has reversed the opposition. The attacker guides the
position back to the center of the board, choosing the right time to advance
toward the castle as indicated above.
This position is extremely artificial, but it
illustrates clearly the perceptiveness of the game’s creator in limiting the
number of castle moves. Without such a limit, whether 2 (as stated), 30, or 100,
either side could use a castle move as a stalling technique, and positions which
can now be won would become draws. [Editor's Note: The limit of two castle
moves per game was established by a 1931 change to the original (1930) Parker
Brothers rules.]
~~~~~~~~~
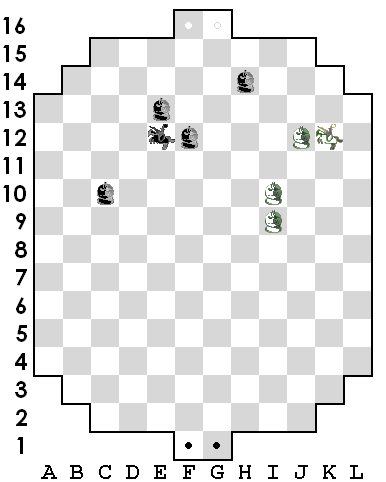
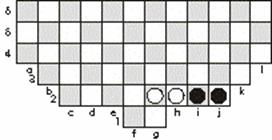
[Editor's Note: The following table displays outcomes, based upon analysis by
Michael Nolan, of all possible two vs. two combinations of pieces set up as in Figure 4,
repeated below.]
